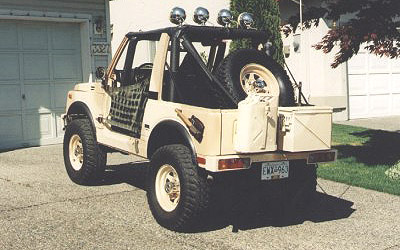
Under chassis lighting is one of those things that you seem to fit "for the hell of it". It serves no real purpose, and is only useful if you are ever going to try driving off-road at night.
Chassis mounted spot lights are an easy and inexpensive modification you can perform to your SJ to make off road driving a more enjoyable experience. You will be surprised at the difference a chassis mounted light system will make when you are off road. As many of you will know, it is difficult enough to drive some of the lanes during the day when there is full available light, so you can imagine what it could be like trying to tackle a lane at night when you can't see the ground under your vehicle.

Tools and equipment ...
-Spotlights (obviously)
-Electrical tape
-In line fuse holder
-15 Amp fuse
-Switch
-"14 guage" wire
-Spanners
-Screwdrivers
-Solder
-Soldering iron
-Wire cutters
-20 Amp "Bosch" or "Hella" relay

Installation ...
The first thing to do is to find a place to mount the chassis lights. This is the mostimportant part of the installation as everything else is installed around these two lights. Find an area on the chassis frame where the light can sit comfortably and out of harms way.
The best spot is on the crossmember in front of the rear axle. Mount them as high as possible where they won't be vulnerable to breakage. Fix the spot light into position, but don't tighten any of the bolts too tight just yet. First we need to connect the wiring and test the lights. Once this is done, we will aim the light beam and tighten everything. Make sure that all your wires are tucked up above the light and are not in a position where they will be pinched or chafed.

Wiring ...
Now it's time to start on the wiring. Run the wires from the two chassis lights to a central point in the engine compartment. It is easiest to run the wires up to a point near the battery where the relay can be easily mounted on the upright metal plate in front of the battery. Use cable ties to secure the wires to the chassis and any other point along the way where they can be held securely. Always try and keep the Black wire as an "Earth" or "Ground" wire. This makes connecting all the wires much easier later on. The connections are relatively easy, and all wires connected to the relay must be terminated with insulated "spade" connectors to reduce the risk of corrosion and electrical shorting.
-Terminal "30" is the "common" power input to
the relay contacts (87 and 87a) and is connected
directly to the battery via an in-line fuse.
-Terminal "85" is the connection for the relay
-Terminal "86" is connected to the chassis light
-Terminal "87" is connected to the positive wire of
-Terminal "87a" is not connected. Insulate it as
there will be power to this point when the relay is off

Join the two black earth wires from the chassis lights together, and terminate them using a "ring" terminal connector. Secure this to a good earth point on the vehicle. It is easiest to use one of the existing earth points on the vehicle body, or even to the same bolt that holds the chassis light in place to the chassis. Now join the two positive wires fom the chassis lights together. Test to see that the lights are working by temporarily connecting these two wires directly to the positive terminal of the battery. Once you are happy that the lights are working, terminate this joint with an insulated "spade" connector, and connect it to terminal "87" on the relay. The next step is to connect power to the chassis lights. This is done by cutting another length of wire, terminating one end with an insulated "spade" connector, and connecting the other end to an in-line fuse holder. The "spade" connector is then connected toterminal "30" of the relay. Connect another length of wire to the other end of the in-line
fuse holder, and terminate this with a "ring" connector. This is then connected to the
positive terminal of the battery.
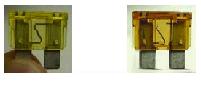
Do not put the 15 Amp fuse in place just yet ! !
It is very important to use a fuse, as this protects the wiring from burning out if there is an electrical short. It's easier and cheaper to replace a fuse that it is to replace the wiring !
Now it is time to decide where you want to mount the On/Off switch for the rear light. Dashboard aesthetics can mean a lot, even in the humble SJ, so if possible, try and get your hands on a standard SJ switch. These are
easier to mount into the dash without having to drill holes as there are usually unused accessory switch bays available. At the end of the day, where you put your switch is entirely up to you. Just make sure that there is enough space behind the switch so that wires will not short out.
Before moving on, it is probably wise to test that the chassis lights and relay work as they should. Connect a length of wire to pin "86" of the relay, and touch this wire to the positive terminal of the battery. The relay should click and the spotlights should come on. If they do not, check all wiring now, before going any further.

Next we need to provide a good earth for the relay. Cut a length of black wire, terminate one end with an insulated "spade" connector, and the other end with a "ring" connector. The "spade" connector is connected to terminal "85" of the relay, and the "ring" connector is earthed to the vehicle body at an earth point.
Now comes the difficult bit - running a single lone wire inside the cab of the SJ to where the swicth is located. The easiest way to do this is to route the wire to the passenger side of the engine bay. There you will see a large rubber grommet in the top right hand corner. Run the wires through the centre of the grommet, along with the other factory wires. Once inside the cab, route the wire along the original wiring harness until you reach a point where to can take it to the On/Off switch. Connect this wire to the switch. The other end of this wire is terminated with a "spade" connector, and is connected to pin "86" on the relay.
One more wire to connect, and the job is done, but before we can connect this wire we have to decide how we want the chassis lights to be activated or "switched" on. This will determine where we connect the wire.
Finally ...For the chassis lights, it is suggested that they be switched independently of any other lights, but only when the ignition is switched on or the SJ is running. This way, you will have total control over the activation and use of the chassis lights while ensuring that the lights are not left on when the SJ is switched off.
Now that every thing is wired up and tested, aim the spotlights, tighten all the bolts, and thats all there is to it! Working spot lights for those night runs.
Before
After


![0610_4wd_01z+suzuki_samurai+group_of_suzukis[1274].jpg](/images/gallery/favourites/0610_4wd_01z+suzuki_samurai+group_of_suzukis[1274].jpg)


![fenderfrt6_SJ-1[376].jpg](/images/gallery/favourites/fenderfrt6_SJ-1[376].jpg)